Unlocking Secure Conversations: A Complete Guide to User Authentication in Microsoft Copilot Studio
If you're building intelligent agents with Microsoft Copilot Studio, there's a good chance your agent needs to access protected resources or personalized information. That's where user authentication comes in. Think of it as the digital handshake that lets your agent know exactly who it's talking to and what information it can safely access on their behalf.
In this guide, we'll walk through everything you need to know about implementing user authentication in Copilot Studio. Whether you're protecting sensitive company data or simply wanting to personalize your agent's responses, you'll find the insights you need to get it right.
Why Authentication Matters
Authentication isn't just about security (though that's certainly important). It's about creating a personalized, trustworthy experience for your users. When your agent knows who it's talking to, it can:
- Access user-specific information without asking redundant questions
- Retrieve personalized data from backend systems
- Perform actions on behalf of the user with appropriate permissions
- Maintain compliance with security and data governance policies
Let's be clear: if your agent needs to access anything beyond publicly available information, authentication should be on your radar.
Understanding Your Authentication Options
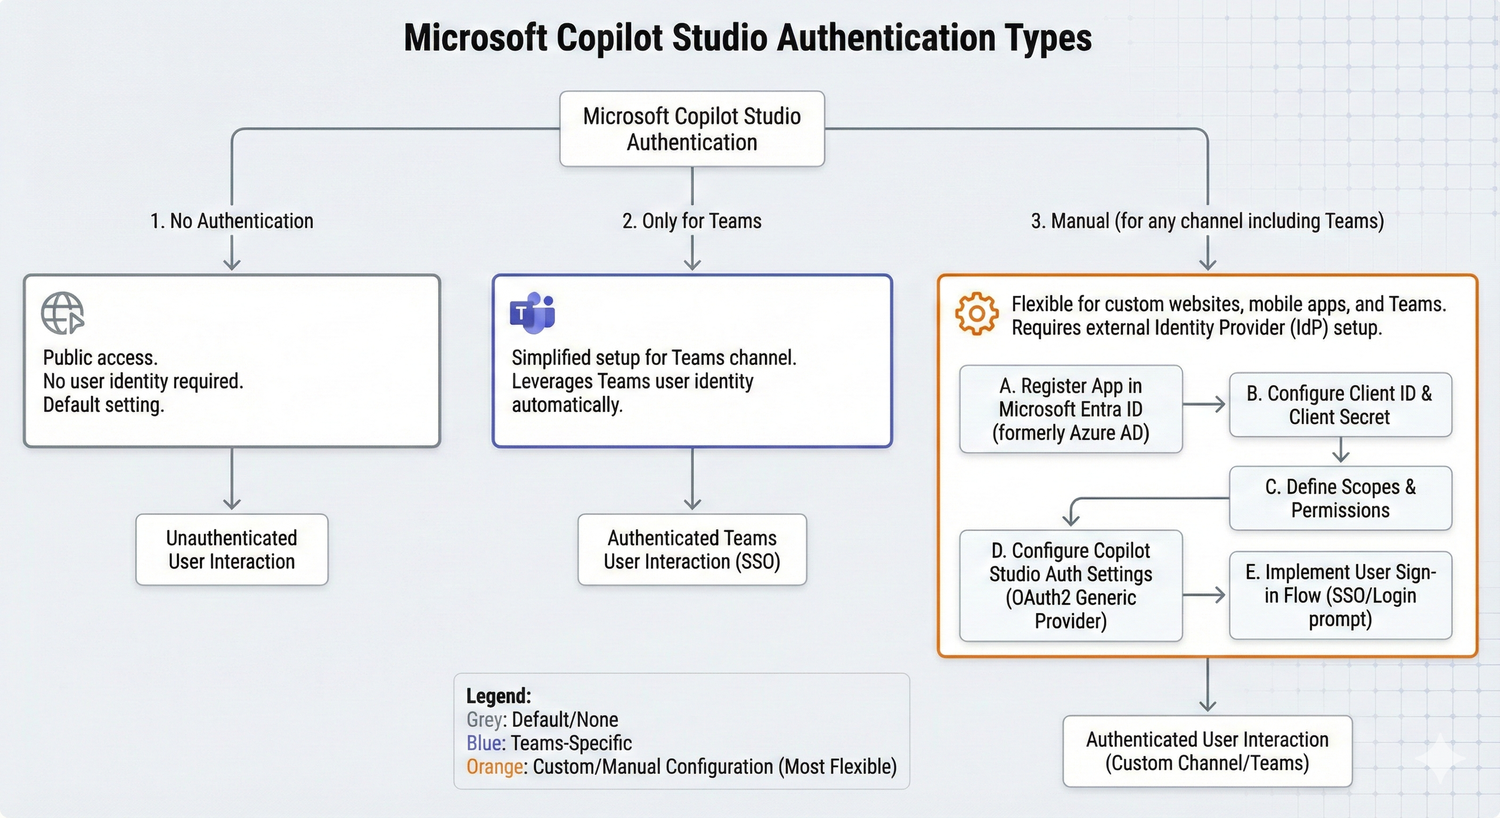
Copilot Studio gives you three main paths for authentication, and choosing the right one depends on your specific needs and deployment scenario.
No Authentication
This is the simplest option, perfect for agents that only need access to public information. Your classic chatbot that answers FAQs or provides general information can work great without authentication. However, this means anyone with a link can interact with your agent, so it's not suitable for sensitive or internal use cases.
A word of caution: if you're deploying within your organization or handling any kind of restricted data, you'll want to look at one of the authenticated options instead.
Authenticate with Microsoft
This option is your streamlined solution for Microsoft Teams deployments. It automatically sets up Microsoft Entra ID authentication without requiring manual configuration. Since Teams itself identifies the user, your users won't be prompted to sign in while they're in Teams (unless your agent needs additional permissions).
The trade-off? This option locks you into the Teams channel only. If you need to deploy your agent across multiple channels, you'll want to use manual authentication instead.
With this configuration, you'll have access to essential user variables like User.ID and User.DisplayName, making it easy to personalize conversations. However, you won't get the User.AccessToken or User.IsLoggedIn variables, which are only available with manual authentication.
Authenticate Manually
This is your most flexible option, supporting multiple authentication providers and giving you full control over the authentication experience. Manual authentication supports:
- Microsoft Entra ID V2 with federated credentials
- Microsoft Entra ID V2 with certificates
- Microsoft Entra ID V2 with client secrets
- Microsoft Entra ID (legacy)
- Any OAuth2-compliant identity provider (like Google or Facebook)
With manual authentication, you get the complete set of authentication variables, including User.AccessToken (for calling backend APIs) and User.IsLoggedIn (for creating branching logic based on sign-in status). This option also lets you choose whether users must sign in at the start of the conversation or only when they reach a topic that requires authentication.
Setting Up Manual Authentication
Let's walk through the key considerations when configuring manual authentication in your agent.
Required Sign-In: A Critical Decision
One of the most important choices you'll make is whether to require users to sign in before they can talk to your agent. We strongly recommend turning this on if your agent handles sensitive or restricted information. It's a simple toggle that can save you from potential security headaches down the road.
When you enable required sign-in, Copilot Studio creates a system topic called "Require users to sign in." This topic automatically triggers for any unauthenticated user, and if they fail to sign in, it redirects to the Escalate system topic. The topic is read-only, which keeps things simple and consistent.
If you turn off required sign-in, your agent will only prompt users to authenticate when they reach a topic that specifically needs it. This can create a more seamless initial experience, but make sure you've thought through the authentication flow carefully.
Key Configuration Fields
When setting up manual authentication, you'll encounter several technical fields. Here are the most important ones to understand:
Client ID and Client Secret: These credentials come from your identity provider (like your Microsoft Entra ID app registration). Think of them as your agent's passport for communicating with the authentication service.
Scopes: This defines what information and permissions your agent can access. For example, including "profile" lets you access the user's display name, while "openid" provides basic identity information. If you're working with Microsoft services, you might include scopes like "Sites.Read.All" or "Files.Read.All" depending on what your agent needs to do.
Authorization and Token URLs: These are provided by your identity provider and tell Copilot Studio where to send users for authentication and where to retrieve access tokens.
One helpful tip: make sure your scope list delimiter is set correctly. By default, it uses a comma, but some identity providers might require spaces. Getting this right prevents frustrating authentication errors.
Bringing Authentication into Your Topics
Once authentication is configured at the agent level, you need to implement it within your conversation flows. Copilot Studio gives you two main approaches.
The Sign-In System Topic
When you enable manual authentication with required sign-in, Copilot Studio automatically creates a Sign in system topic. This topic kicks in at the very start of any conversation with an unauthenticated user, prompting them to authenticate before they can proceed.
The beauty of this approach is its simplicity. Users authenticate once at the beginning, and then your entire conversation flow can assume they're authenticated. The system topic handles all the heavy lifting, including redirecting to escalation if sign-in fails.
One important note: this system topic should remain focused on authentication. While you can customize some messaging, resist the temptation to add other actions or flows to it. Keep it clean and focused on its core purpose.
Custom Authentication Nodes
For more granular control, you can add authentication at specific points in your conversation using Authenticate nodes. This is perfect when you want users to interact with your agent without authentication initially, then prompt them to sign in only when they reach a topic that requires it.
To add an Authenticate node, simply select "Add node" in your topic editor, then choose "Advanced" and "Authenticate." Copilot Studio automatically creates both success and failure paths, making it easy to handle different scenarios.
The success path (where User.IsLoggedIn equals true) is where you put any logic that requires authentication, like calling a Power Automate flow that accesses backend systems with the user's credentials. The failure path handles cases where sign-in failed or was canceled. You might offer users a chance to retry or escalate to a live agent.
Here's a pro tip: always test both paths thoroughly. Authentication can fail for various reasons, from simple password mistakes to issues with your identity provider, and you want your agent to handle these gracefully.
Working with Authentication Variables
Once authentication is set up, you have a powerful set of variables at your disposal. Let's look at the most useful ones.
User.DisplayName
This variable contains the user's display name from their identity provider. Use it to personalize greetings and make conversations feel more natural. Instead of asking "What's your name?" you can jump right in with "Hi, Sarah! How can I help you today?"
Important note: this variable isn't guaranteed to have a value. Always test with real users from your identity provider to make sure your topics handle empty values gracefully.
User.Id
This is the unique identifier for the user in your identity provider. It's especially useful when calling Power Automate flows or APIs that need to identify the specific user. Like User.DisplayName, this might be empty, so plan accordingly.
User.IsLoggedIn
This Boolean variable is incredibly useful for creating branching logic. You can check if a user is authenticated and adjust your conversation flow accordingly. For example, you might offer personalized recommendations to authenticated users while showing general information to unauthenticated visitors.
User.AccessToken
This is your golden ticket for accessing backend systems on the user's behalf. When you pass this token to Power Automate flows or custom APIs, they can retrieve user-specific data or perform actions with the user's permissions.
A critical warning: treat this variable with extreme care. It contains sensitive authentication information that, if compromised, could seriously harm your users. Never display it in message nodes, never send it to untrusted sources, and always validate that you're passing it only to secure, authenticated services you control.
Authentication for Actions: A Different Approach
When you're creating Copilot Studio actions (formerly known as plugins), you have a different authentication model to consider. Instead of user authentication at the agent level, you choose authentication at the action level.
Agent Author Authentication
This option means the action runs using a fixed set of credentials, typically yours as the agent creator. It's perfect for low-risk scenarios where data access doesn't need to be user-specific. Think of use cases like finding a support phone number for a postal code or getting current weather data.
The advantage here is simplicity. Users don't need to authenticate separately for these actions. The disadvantage is that everyone gets the same level of access, which isn't suitable for personalized or sensitive data.
User Authentication
This is your go-to choice when actions need to respect individual data permissions. With user authentication, each user connects with their own credentials, and the action runs in their security context.
When a user hits a dialog that requires an authenticated action, they're prompted to create a connection right away. They can see all their connections on a dedicated page, where they can refresh or revoke permissions as needed. Copilot Studio doesn't store these credentials, so users must re-authenticate when their access tokens expire.
This approach is essential for scenarios like retrieving user-specific data from SharePoint, accessing personal files, or performing actions that should only be available to certain users.
Channel Support Considerations
Not all channels support user authentication for actions equally. The good news is that the most common channels are covered: Custom Website, Demo Website, Microsoft Teams, Mobile App, SharePoint, and Dynamics 365 Omnichannel (live chat only).
If you're using Microsoft Teams, make sure to configure single sign-on settings properly. Failing to do so will cause authentication failures that can be frustrating to debug.
Testing: The Often-Overlooked Critical Step
Here's something that trips up many developers: testing authentication with real users is non-negotiable. The Test bot pane in Copilot Studio uses your own account by default, which means you might not catch issues that affect actual users.
Copilot Studio provides some helpful testing commands you can use right in the Test bot pane:
- To set a custom display name:
/debug set bot.UserDisplayName "Test User" - To test with an empty display name:
/debug set bot.UserDisplayName "" - To test with an empty user ID:
/debug set bot.UserID ""
Note that you can't set custom user IDs for security reasons, but you can test with blank values to see how your agent handles missing data.
Always test both the success path (user signs in successfully) and the failure path (sign-in fails or is canceled). Authentication flows are complex, and issues can arise from many sources: user error, identity provider problems, configuration mistakes, or network issues.
Security and Governance: Getting It Right
Authentication is a cornerstone of security, but it's not the only piece of the puzzle. Here are some best practices to keep in mind:
Plan for published changes: Authentication configuration changes only take effect after you publish your agent. This means you should plan carefully before making changes, especially in production environments.
Use data policies: Power Platform administrators can create data policies that enforce authentication requirements across agents. If you see an error banner indicating a data policy violation, you'll need to either adjust your authentication settings or work with your admin to modify the policy.
Control agent sharing appropriately: Your authentication settings directly impact who can chat with your agent. With no authentication, anyone with a link can chat. With Microsoft authentication, you can use agent sharing to control access. With manual authentication using Microsoft Entra ID, you can also leverage sharing controls if you require users to sign in.
Keep scope minimal: Only request the permissions your agent actually needs. This follows the principle of least privilege and helps maintain user trust.
Real-World Implementation Tips
After working with authentication across various Copilot Studio projects, here are some lessons learned:
Start with authentication from the beginning: Retrofitting authentication into an existing agent is much harder than building it in from the start. Even if you're not sure you need it yet, consider it during your initial design.
Document your authentication flow: Create a clear diagram showing when and where users authenticate, what happens on success and failure, and what data your agent accesses. This helps with troubleshooting and onboarding new team members.
Monitor authentication failures: If users frequently fail to authenticate, investigate why. It might be confusing UX, misconfigured identity providers, or users who don't have the right permissions.
Provide clear messaging: When users need to authenticate, explain why in friendly language. "To show you your personalized dashboard, I'll need you to sign in" is much better than just popping up a sign-in card without context.
Consider the mobile experience: Authentication flows can be trickier on mobile devices. Test thoroughly on the channels your users actually use.
Wrapping Up
User authentication in Microsoft Copilot Studio might seem complex at first, but it's really about making deliberate choices that match your use case. Start by identifying what information your agent needs to access, determine who should have access to your agent, and choose the authentication approach that balances security with user experience.
Remember these key takeaways:
- Use "No authentication" only for public information
- Choose "Authenticate with Microsoft" for Teams-only deployments with simple needs
- Select "Authenticate manually" when you need flexibility, multiple channels, or fine-grained control
- Always require sign-in for sensitive information
- Test thoroughly with real users from your identity provider
- Treat authentication tokens with extreme care
- Plan authentication into your agent design from the beginning
With the right authentication setup, your Copilot Studio agent can provide secure, personalized experiences that users trust and value. The upfront investment in getting authentication right pays dividends in security, user satisfaction, and peace of mind.
Now it's time to put these concepts into practice. Start with your authentication requirements, choose your approach, and build agents that keep your users' data safe while delivering exceptional conversational experiences.
Enjoyed this article?
Share it with your network
Comments (0)
Sign in to join the conversation
Sign In to CommentNo comments yet. Be the first to share your thoughts!